How do I upgrade from My Art Collection 1.0 to My Art Collection 2.0?
By the upgrade Here
Importing to Version 2.0
- Launch My Art Collection 1.0
- Hit the Show All Button to make sure that all records are shown.
- Go to File/ Save a Copy As and save a copy of the MyArt.MA1 file to your desktop.
Importing to Version 2.0
- Install My Art Collection 2.0
- Launch My Art Collection
- Go to File/Import from My Art Collection 1.0
- When prompted locate the file MyArt.MA1 on your desktop.
- Choose a new file name (MyArt_Converted.MA2) and location for the converted file. (We recommend your desktop as it will be easy to find.)
- Your file will be converted and you will be asked to restart the program to complete the process.
- Launch My Art Collection 2.0
- When prompted locate the converted file on your computer.
- The data will be imported.
How do I move My Art Collection 2.0 to a new computer?
On the OLD computer.
Once on the NEW computer:
- Launch the My Art Collection 2.0 on your old machine.
- Go to File/ Save a Copy As and save a copy of the MyArt.Ma2 file to your desktop and save it as MyArt_TodaysDate.MA2
- Move the file from your OLD computer to your NEW computer.
Once on the NEW computer:
- Install My Art Collection 2.0
- Download the MyArt_TodaysDate.MA2 to the new computer.
- Launch My Art Collection 2.0
- Go to File/Import from My Art Collection 2.0
- Locate the the MyArt_TodaysDate.MA2 on the new computer
- The data will be imported.
How do I batch load my images at once?
Answer: Creating multiple records automatically is easy to do and makes the inventory process much faster. To create multiple records automatically…
1. Take one digital picture for each of your pieces of art and place them in a folder on your hard drive. (It is highly recommended that you resize the images to 400x600 before importing.) You can add other pictures such as details later on if needed.
2. Go to the "File" drop down at the top of your screen and choose the "Batch Import a Folder of Images..." option
3. A message box will appear asking you if you are sure that you want to import all images from a folder.
4. Click the "Ok" button.
5. A message box will appear asking you locate the folder of images.
6. Click the "Ok" button.
7. Locate the folder in the file browser menu.
Your images will be imported and a new record will be automatically created for each picture you took and the name of the picture will beplaced in the item field.
1. Take one digital picture for each of your pieces of art and place them in a folder on your hard drive. (It is highly recommended that you resize the images to 400x600 before importing.) You can add other pictures such as details later on if needed.
2. Go to the "File" drop down at the top of your screen and choose the "Batch Import a Folder of Images..." option

4. Click the "Ok" button.
5. A message box will appear asking you locate the folder of images.
6. Click the "Ok" button.
7. Locate the folder in the file browser menu.
Your images will be imported and a new record will be automatically created for each picture you took and the name of the picture will beplaced in the item field.
How do I resize my images using iPhoto?
Answer: Resizing your images is easy with iPhoto.
1. Import your images from your camera to iPhoto.
2. From your library, select which photo(s) you want to resize. If you want to resize a group of photos you can do so by selecting multiple photos at one time or selecting all in an Album.
3. From the “File” menu at the top of your screen, select “Export.” Make sure the new window is on the “File Export” tab.
4. Choose the format for exporting the file. Select “JPG” from the drop-down menu.
5. Beneath the Format drop-down menu, on the left side, are the size options. Select “Scale images no larger than:”
6. Change the pixel width to 600 or height to 400 depending on how you would like your photo to be resized.
7. Click “Export." Select the title and destination for the resized photo(s). Click “OK."
8. Once they are exported use those photos to import to My Art Collection.
How do I print a report?
Answer: Select the "Report" Button located to the upper right of the "Art List " or "Art Detail" layouts.
Once in the "Report" layout choose a report to run by selecting it's "Run Report" button. Choose the option for the report that best fits your needs.
A message will appear. " To print, choose the "Print" option from the "File' menu above...."
Choose "OK"
The report will appear.
To edit your page set up go to the "File" menu located at the top left of your screen and choose "Page Setup" from the drop down. From there choose from the options your printer allows you. If not already the default, choose 8.5X11 for the page size and set the orientation to vertical.
Then choose from the same "File" menu and select the "Print" option
.NOTE: If you are printing a list of multiple items but only one is printing, you will need to look for an option while in the "Print" dialog that allows you to choose from either "Records Being Browsed" or "Current Record". Choose "Records Being Browsed".
How do I delete a record?
Answer: To be safe it is best to make a back up your data file in case of an accident. To do so simply choose the "Save a Copy As" option under the "File" menu located at the top left of your screen. Save the file as "MyArt-Back Up" in a folder on your hard drive or other storage device in case something happens to your working file.
To delete a record.
1. Go to the record you wish to delete by clicking on it's line in the Art List or going to it's Art Detail view.
2. Next select the "Records" drop down located at the top of your screen. Once in that menu choose the "Delete Record" option.
3. Select "Yes" when asked if you are sure you want to permanently delete this record.
How do I do a custom sort?
Answer: To do a custom sort by any field, choose the "Records" drop down from top menu bar and select"Sort". An interface will appear that allows you to choose the fields and setting to sort by. Make your selecting and select the "Sort" button.
How do I import an Excel file to this software?
Answer: To Import data from an Excel file...
1. Launch My Art Collection (full or trial) and choose the File/ Import Records/File option.
2. Choose the file type to import.
3. Choose your file.

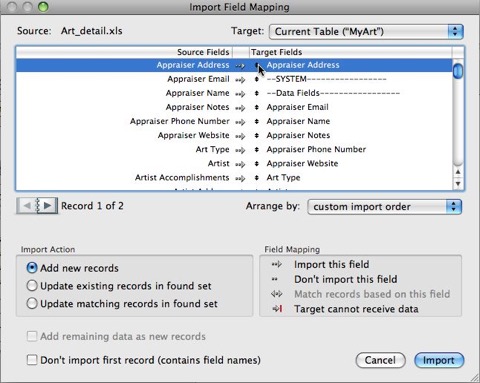
2. Use the field mapping feature to map your data to the available fields. Slide the fields on the right to match your data on the left. Note, if you don’t already have it, add the field title to the first line of your excel sheet. I.e. Arts Name, Medium etc. Titles of the column help you map it to our available fields.
4. Leave the default setting of "Add New Record" in the "Import Action" section as is.
5. Click the Import Button.
6. An "Import Options" Dialog Box will appear. Leave all options unchecked and Click OK.
Note: If doing this on the My Art Collection Trail, your data will be delete on closing. Test the product fully while open then once finished, close the program.
1. Launch My Art Collection (full or trial) and choose the File/ Import Records/File option.
2. Choose the file type to import.
3. Choose your file.
2. Use the field mapping feature to map your data to the available fields. Slide the fields on the right to match your data on the left. Note, if you don’t already have it, add the field title to the first line of your excel sheet. I.e. Arts Name, Medium etc. Titles of the column help you map it to our available fields.
4. Leave the default setting of "Add New Record" in the "Import Action" section as is.
5. Click the Import Button.
6. An "Import Options" Dialog Box will appear. Leave all options unchecked and Click OK.
Note: If doing this on the My Art Collection Trail, your data will be delete on closing. Test the product fully while open then once finished, close the program.
Can I edit the Currency of the application?
Answer: Yes. To do so go to the "Tools" menu located next to "Window" on the top menu bar and select the "Edit Currency" option from the drop down. Once the dialog box displays, type the symbol for the currency you wish to use.
How many art records will the software hold?
Answer: This depends on if you will include images or not and how you choose to include the images. If you do not include images you should be able to hold millions of art records. If you include images at a low resolution (72dpi) then you should be able to hold 10 to 20 thousand art records. If you include images but choose to save only a reference to the image (it is an option when importing images) you will be able to hold again millions of records.
If the Artist Information changes for an artist, how do I update all of the records that share the same artist information at once?
Answer: In this version we have a feature that looks up the first record that exists for an artist and pulls that artist data into the next artist record you create. Thus if the first artist record is not the latest it will pull older data into the new record. The first record is defined by the first record in your Art List for that artist at that time.
When you have a group of records that have the same artist and you need to edit the artist data for all records you will want to perform the following.
You can do this for the artist, sales history, and the appraisal/authentication section. As all of the information in these sections looks up data based on the name of the person assigned to that section.
When you have a group of records that have the same artist and you need to edit the artist data for all records you will want to perform the following.
- Do a find for the artist that you want to change/edit the artist data. (Enter the find mode, type the name of the artist in the artist field and click the “continue” button.)
- When the list of records are displayed go to the first record in the list and go to the artist section if not already there.
- Edit the artist data for the artist in the first record.
- Put your curser in the “Artist” field and and go to Records/Relookup Contents.
- You will be asked if you want to replace all data in the records you are viewing.
- Click OK.
You can do this for the artist, sales history, and the appraisal/authentication section. As all of the information in these sections looks up data based on the name of the person assigned to that section.
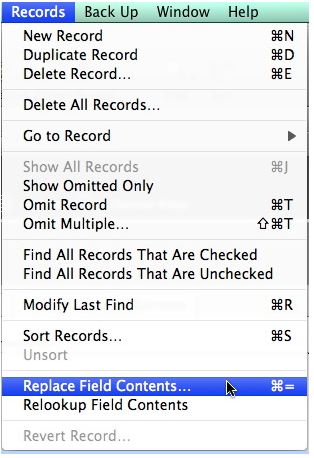
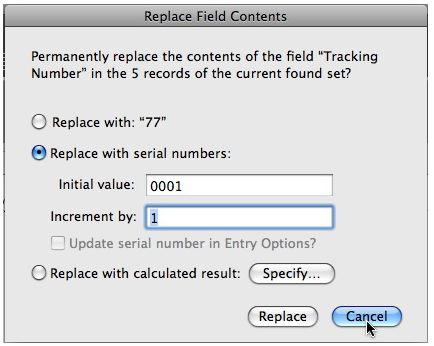
How do I renumber the Tracking # so that all records sequentially automatically?
At the end of the inventory process you can renumber all records sequentially automatically by putting your curser in the Tracking # of the FIRST record and going to Records/Replace Field Contents in the upper menu bar. Remember to hit the Show All Records button or go to Records/Show All Records to make sure all records are currently displayed.
When the dialog pops up, choose the “Replace with serial numbers:” option, make your choice of how long your number will be and click Replace. This will serialize all records in your art list at once automatically. If you add new records later just manually at the next sequential serial number.
When the dialog pops up, choose the “Replace with serial numbers:” option, make your choice of how long your number will be and click Replace. This will serialize all records in your art list at once automatically. If you add new records later just manually at the next sequential serial number.